Using Disk Utility on Your Mac For More than Just First Aid
Posted: July 2nd, 2013 | Author: admin | Filed under: Uncategorized | No Comments »When problems pop up with your Mac you may think of using Disk Utility to straighten them out. You’re not alone if that’s your first thought about Disk Utility, because many Mac users think that being able to resolve some of your Mac’s problems is all that Disk Utility can do. Well, that and using Disk Utility as a maintenance program.
(Image 1)
Although it’s great for maintaining your Mac and does have great First Aid features, including fixing startup problems, and verifying and repairing disk errors, there are actually many lesser known talents that you can be using Disc Utility for. Like what you ask? Well, like partitioning or erasing a drive, mounting and unmounting volumes, creating a disk image and erasing a CD-RW or DVD-RW disc. How’s that for a start? Want to know more about using Disk Utility on your Mac? Great, follow me me to your Disk Utility so you can follow along!
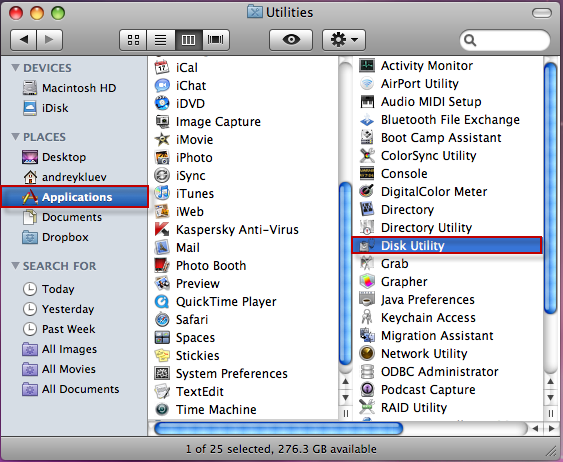
Finder>Applications>Utilities>Disk Utility

Use Disk Utility to Mount & Unmount Volumes
Using your Mac’s Disk Utility program for mounting and unmounting volumes (drives / disks) begins our list of its lesser known talents. Under normal circumstances, mounting and unmounting external drives is very easy. But occasionally, a drive will not mount correctly, or you will unmount a drive and not remember how to remount it.
(Image 2)
When you launch Disk Utility, you will see a list of all drives that are connected, but not mounted, listed on the left side of the window. To re-mount a drive, simply select it, and then click the ‘Mount’ button on the toolbar. If you want to eject, or unmount a drive, you can use Disk Utility to do that too. Remember though, that you must eject all of the drive’s partitions or none of them, you cannot pick and choose the partitions to eject.
Erase a DVD-RW or CD-RW Disc
(Image 3)
In our second way that you can be using Disk Utility for more than a fixer upper, you can try out the Erase tab. In the Erase area you can erase a drive, or if you are using DVD-RW or CD-RW discs as a backup or for storage, you may want to erase the data from it so that you can reuse it or again.
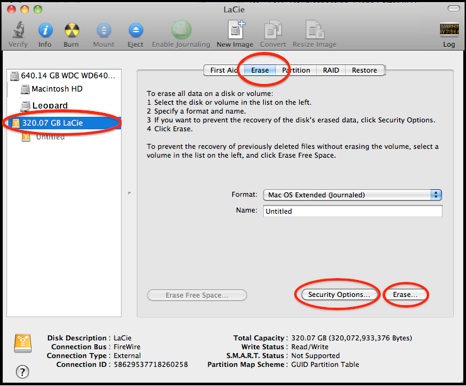
To erase a disc, select the disc from the same window on the left that shows the list of drives / disks. Once you have it selected you now use Disk Utility to erase it by choosing the Erase tab. Then choose if you want it to erase the information Quickly or Completely. It will give you instructions below to help you know which to pick. Lastly, you click on the Erase button and if you picked Quickly it will be done in just a few minutes. If you went with Completely it will take around an hour to completely complete the process.
(Image 4)
Erase a Drive Completely
As mentioned earlier, Erase can be used to erase a drive too, such as your hard drive. Why on earth would you want to use Disk Utility, or any other program, to erase everything from your Mac’s hard drive? There are a few reasons for needing to do this, the most common of them being that you are selling your Mac. Fortunately, Disk Utility can tackle this for you quickly, and easily. There are actually two different ways you can use Disk Utility to erase your hard drive.

(Image 5)
Way 1 to Erase a Hard Drive Using Disk Utility: Faster but Less Secure
The quickest way to use the Erase feature in Disk Utility to erase your hard drive is to select the Volume (drive), and then choose the Erase tab. While this makes the disk appear to be empty, the data is actually still there hidden. The only thing that is really gone is the catalog directory, which is what points to all of the files.
Once done, your Mac will consider the space to be free space, which means it will now take any new data and use it to overwrite the old data. This may make you think that your old data can still be found on your hard drive or that some of it could still be accessed, you would be right to think so. While it is not easy for the data that is left to be found or accessed, there are some programs, or individuals, that have the ability and skills to still get at your information. If this is not okay or good enough for you, it’s all good, just move on to way 2.
Way 2 to Erase a Hard Drive Using Disk Utility: Slower but More Secure
If you are not satisfied with the option of writing over the data that is already on the drive with new data, you can use a slower but more secure alternative. By erasing your hard drive with the steps I will give you below, all still using Disk Utility, you will completely remove all data so that no hacker or service can ever access it.
To completely erase your hard drive: launch Disk Utility and then click on the ‘Security Options’ button. You now get to choose just how secure this erase will be. Once that opens, you will have a few different erasing options such as 7 or 35-Pass Erase, and Zero Out Data. If you choose 7 or 35-Pass Erase, the drive is erased many times to ensure that every piece of data is completely removed, however, the more passes you choose, the longer this will take. Under normal circumstances, Zero Out Data, which is only one pass, should work perfectly well.
Partition a Drive
Partitioning a large hard drive is something that many people want to do. When you partition a drive, you are splitting the drive up into several smaller parts. Some reasons why people partition their drives include: booting into different operating systems, creating a backup drive, and for convenient and secure file sharing.
(Image 6)

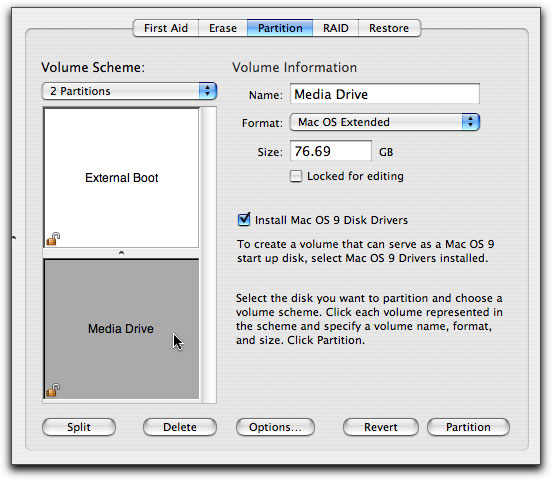
To partition a drive using Disk Utility, launch the application and then select the drive on the left side. Once the drive is selected, click on the Partition tab. If you are partitioning an external drive, you will then need to click on Options and choose the preferred option from the Volume Scheme menu. Then, select the number of partitions you want to make, the size of each, and give each one a unique name. Then simply click on the Partition button and Disk Utility will erase and reformat the drive.
Creating a Disk Image
Most downloadable software comes in the form of a disk image, and you can tell which ones do because they have the .dmg file extension. All you have to do to open the disk image is double click on it, and then all of the contents appear on your desktop.
You can also create your own disk images using Disk Utility. This will allow you to create a single, unique file that contains a duplicate of the contents of a folder. If you use Disk Utility’s default options, the file will even be compressed to save disk space.
(Image 7)
To create a disk image, launch Disk Utility and then choose File: New Disk Image or choose it from the top. Then simply navigate to the desired folder and click on Image. You will have to give the image a name, and then click on Save. You can also password protect your disk images by choosing AES-128 from the Encryption menu in the Save dialog box. (Image 8)

Leave a Reply